Overview
What the admin area lets you do
The Murther Fire Protection website has a built-in administration area that lets authorised staff update all the content on the public site without any technical knowledge. There is no need to edit code or upload files via FTP — everything is managed through a web browser.
The admin area covers eight sections:
- Staff — the team members shown on the About Us and Contact pages.
- Offices — office location details shown on the Contact page.
- Case Studies — project portfolios shown on the Case Studies page.
- Clients — client logos shown in the Clients section of the home page.
- Accreditations — accreditation logos shown across the site.
- Text Blocks — editable text snippets used in page headings and descriptions.
- Image Library — a central store of images that can be referenced anywhere.
- Enquiries — contact form submissions sent via the public Contact page.
Logging In
How to access the admin area
The admin area is protected by a username and password. To log in:
- Visit the website and click the Log in link in the top navigation bar.
- Enter your email address and password, then click Log in.
- Once logged in, a new Admin link will appear in the navigation. Click it to open the admin dashboard.
To log out, click Log out in the top navigation bar. Always log out when you are finished, especially on a shared computer.
Dashboard
A quick overview of site content
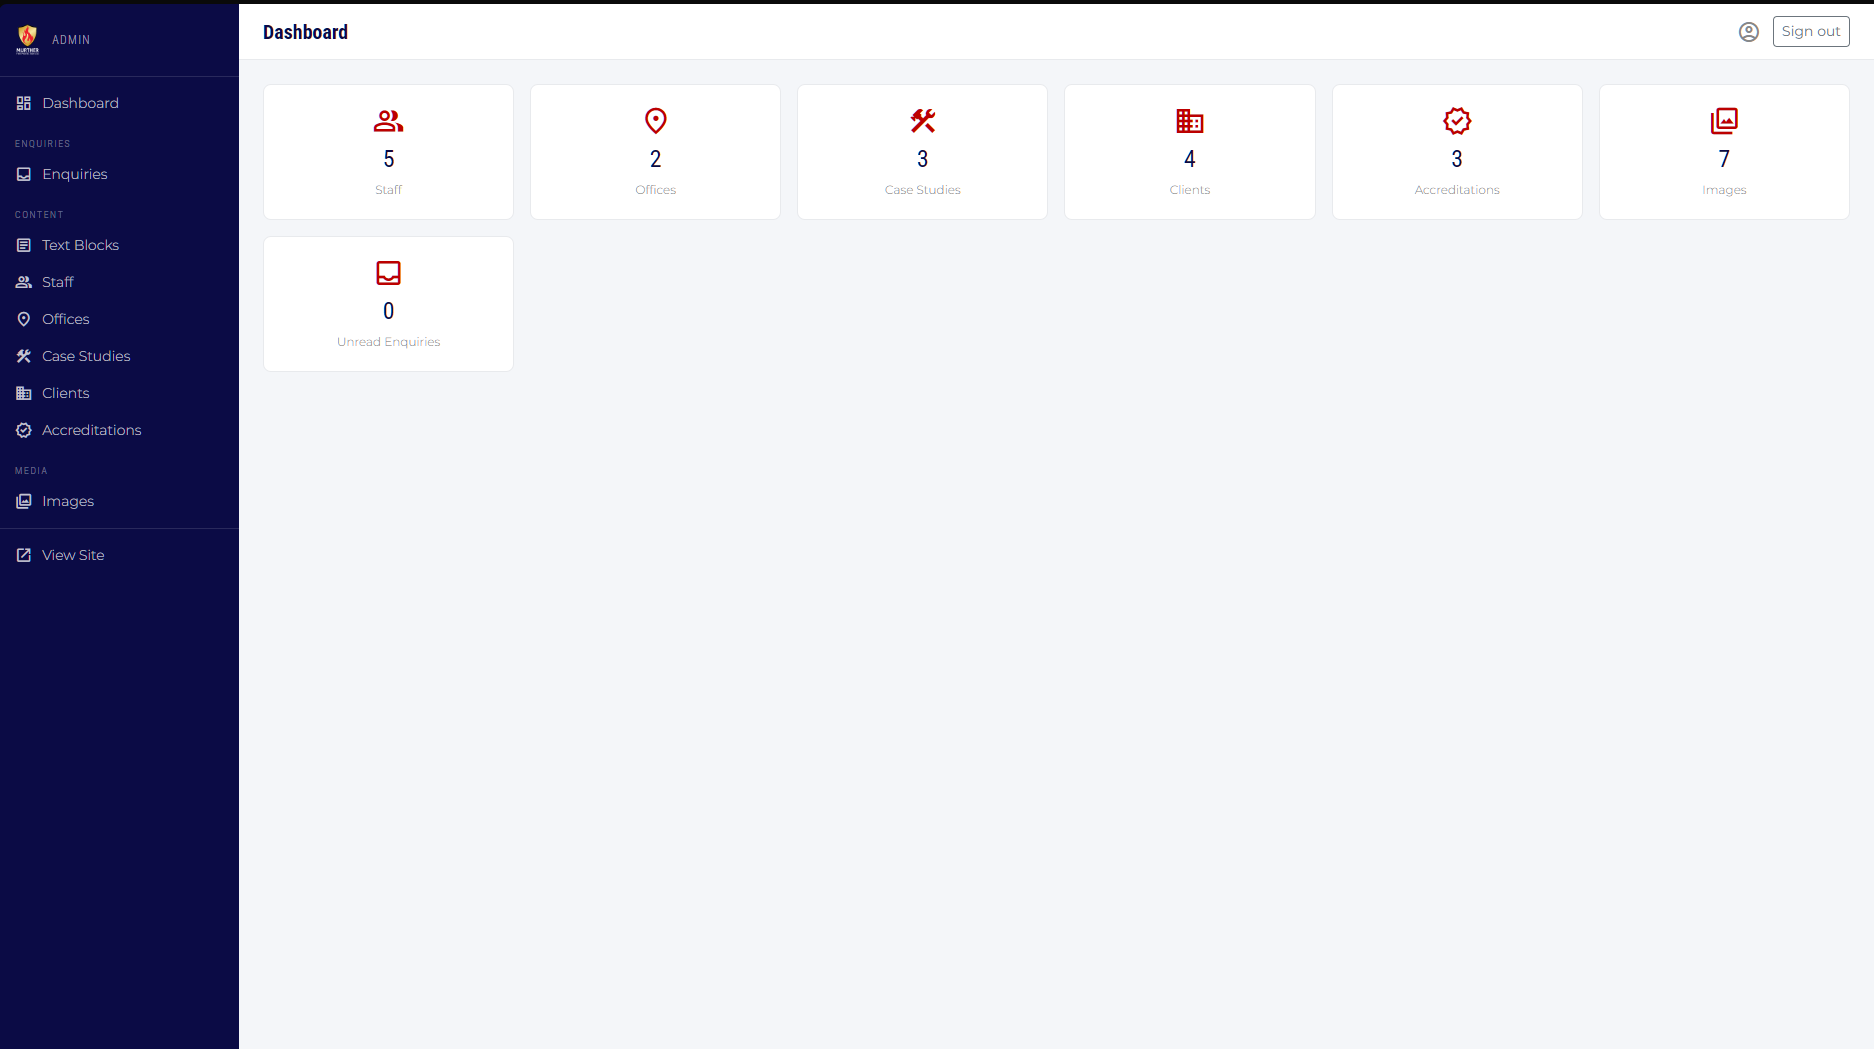
The dashboard is the first page you see after clicking the Admin link. It shows a count card for each content type. If there are any unread enquiries, the Enquiries card turns red to draw your attention.
Click any card to go directly to that section. You can also use the navigation links on the left-hand sidebar.
Staff
Team members shown on the About Us and Contact pages
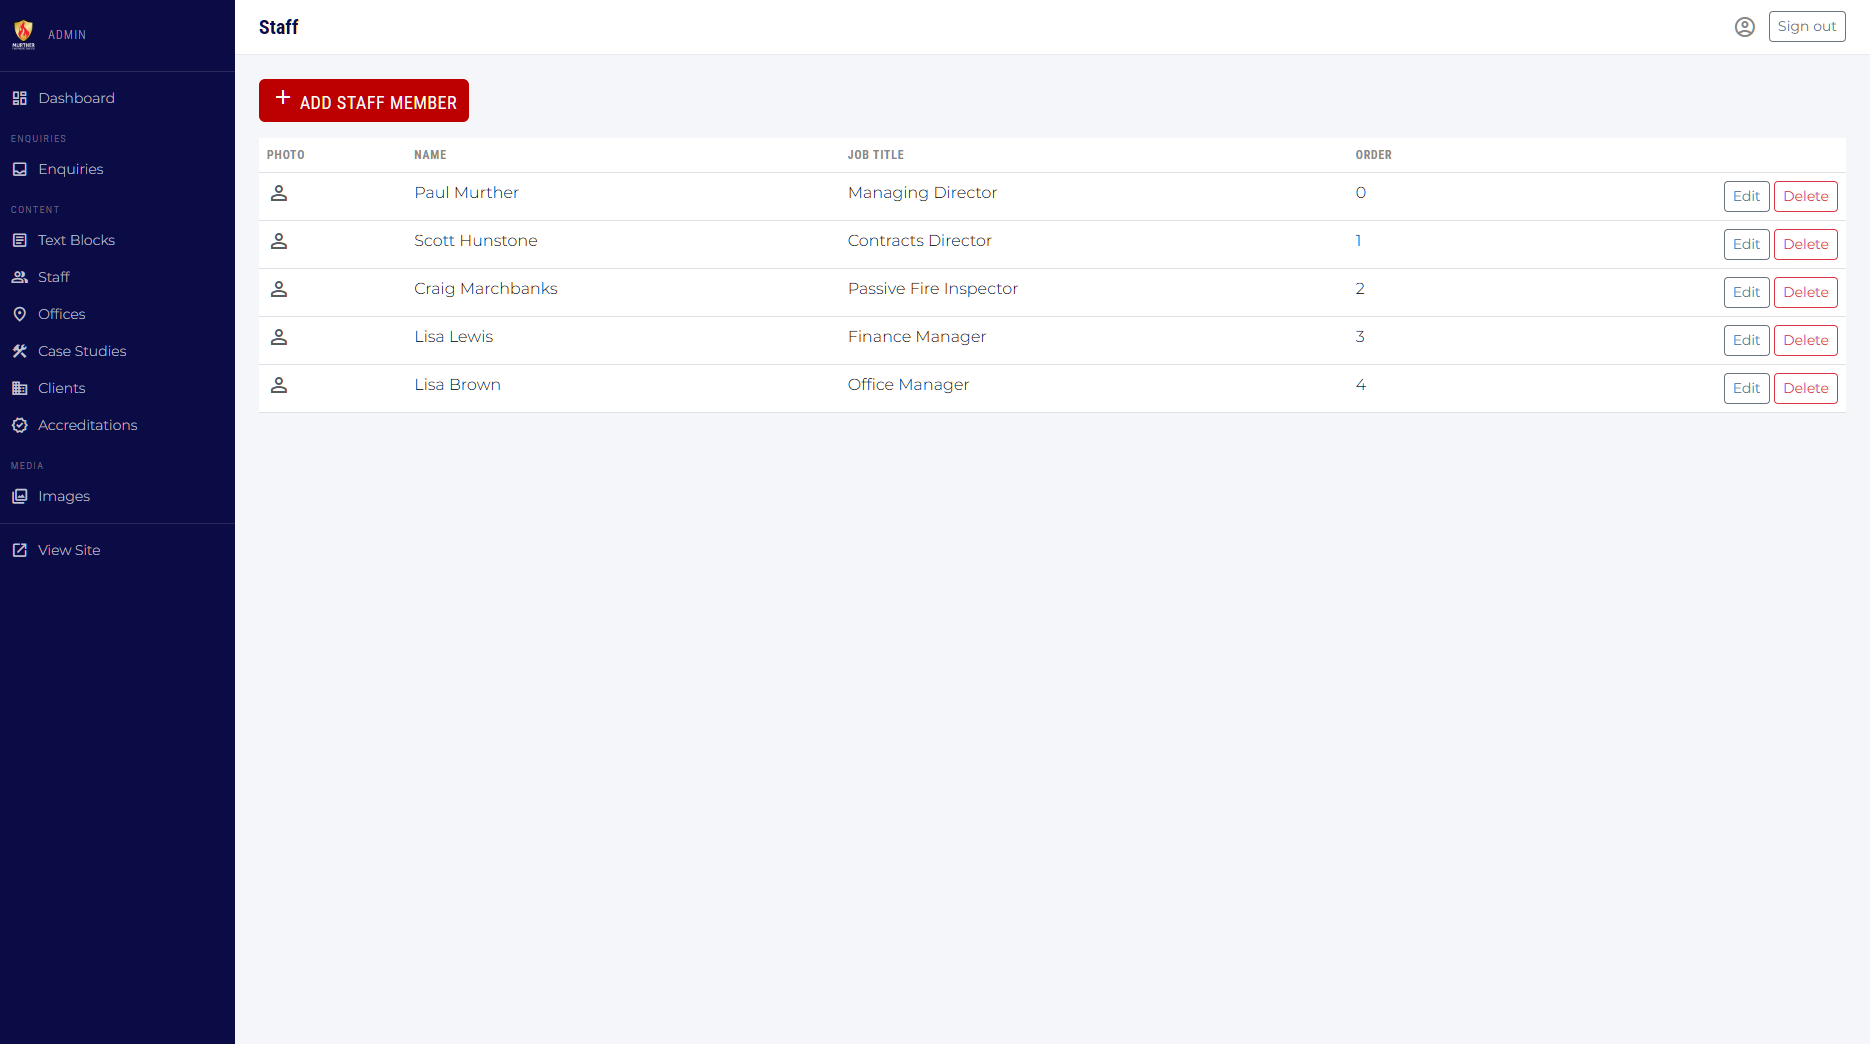
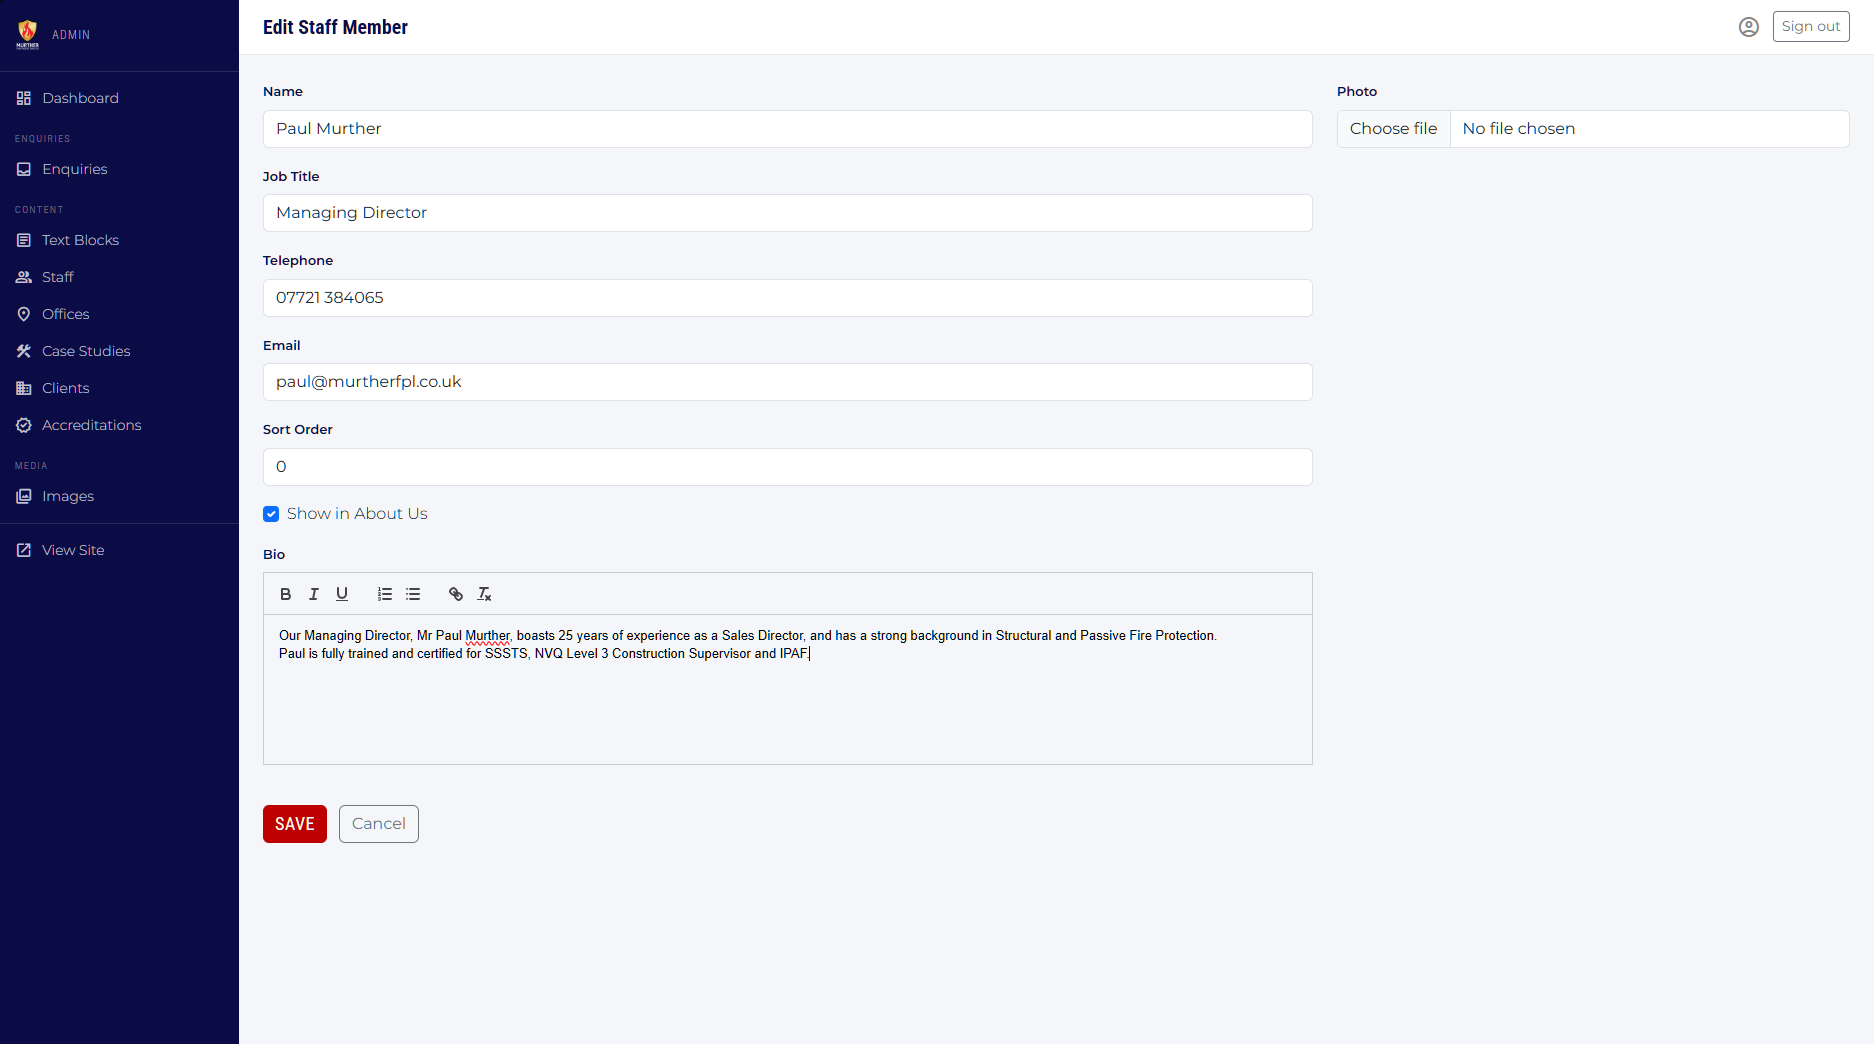
The Staff section controls who appears on the About Us and Contact pages. Each staff member has a photo, bio, contact details, and two visibility settings.
Adding a new staff member
Click Add Staff Member at the top of the list. Fill in the form and click Save.
Editing an existing staff member
Click Edit on the row for the person you want to update. The same form opens pre-filled with their current details.
| Field | Notes | Required? |
|---|---|---|
| Name | Full name as it should appear on the site. | Required |
| Job Title | Displayed beneath the name. | Required |
| Telephone | Shown on the Contact page next to this person's card. | Optional |
| Shown on the Contact page as a clickable link. | Optional | |
| Sort Order | Lower numbers appear first. Leave blank for automatic ordering. | Optional |
| Show in About Us | Tick to include this person in the About Us team section. Untick to hide them from that page while still keeping them on the Contact page. | Optional |
| Bio | Rich text biography. Supports bold, italic, bullet lists and links. | Optional |
| Photo | Upload a portrait photo. Accepted formats: JPG, PNG, WebP. The current photo is shown if one has already been uploaded. | Optional |
Deleting a staff member
Click Delete on the list row. A confirmation prompt will appear before the record is permanently removed.
Offices
Office locations shown on the Sites page
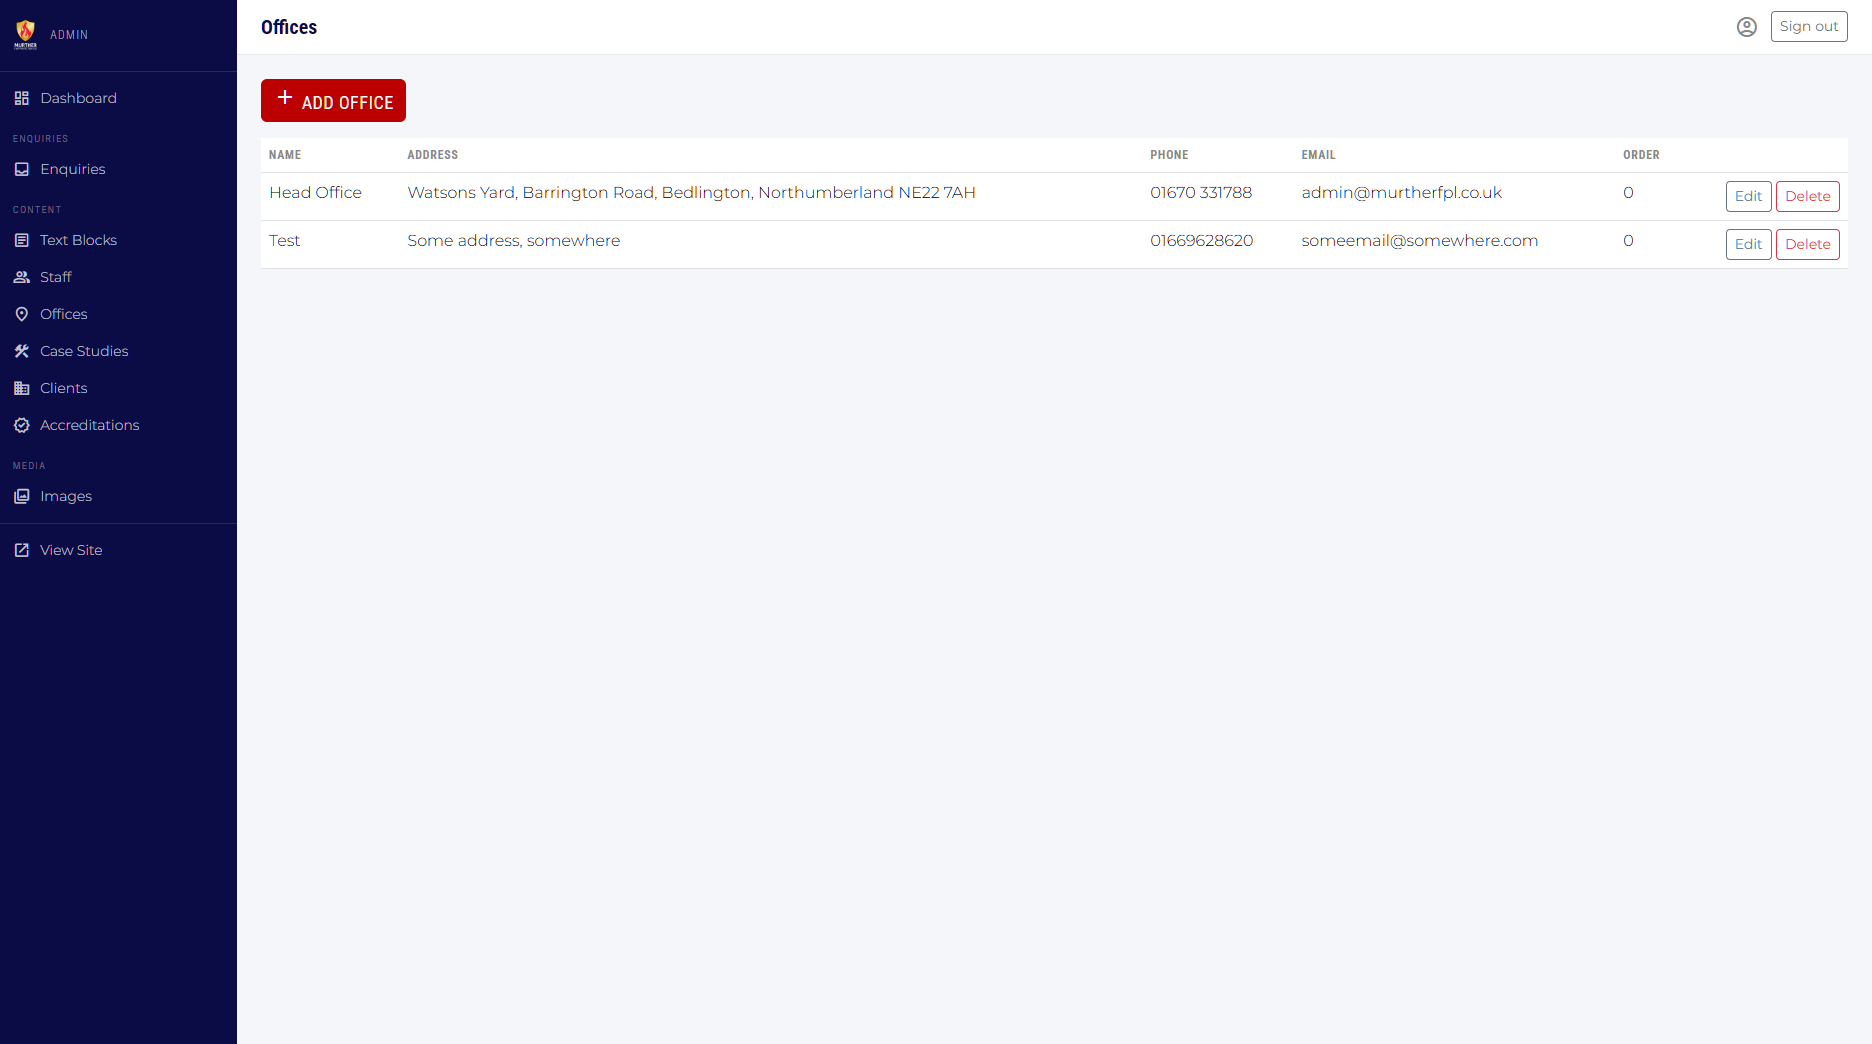
Each record in this section represents a physical office. The details are shown on the Sites page.
Adding or editing an office
Click Add Office or Edit on an existing row to open the form.
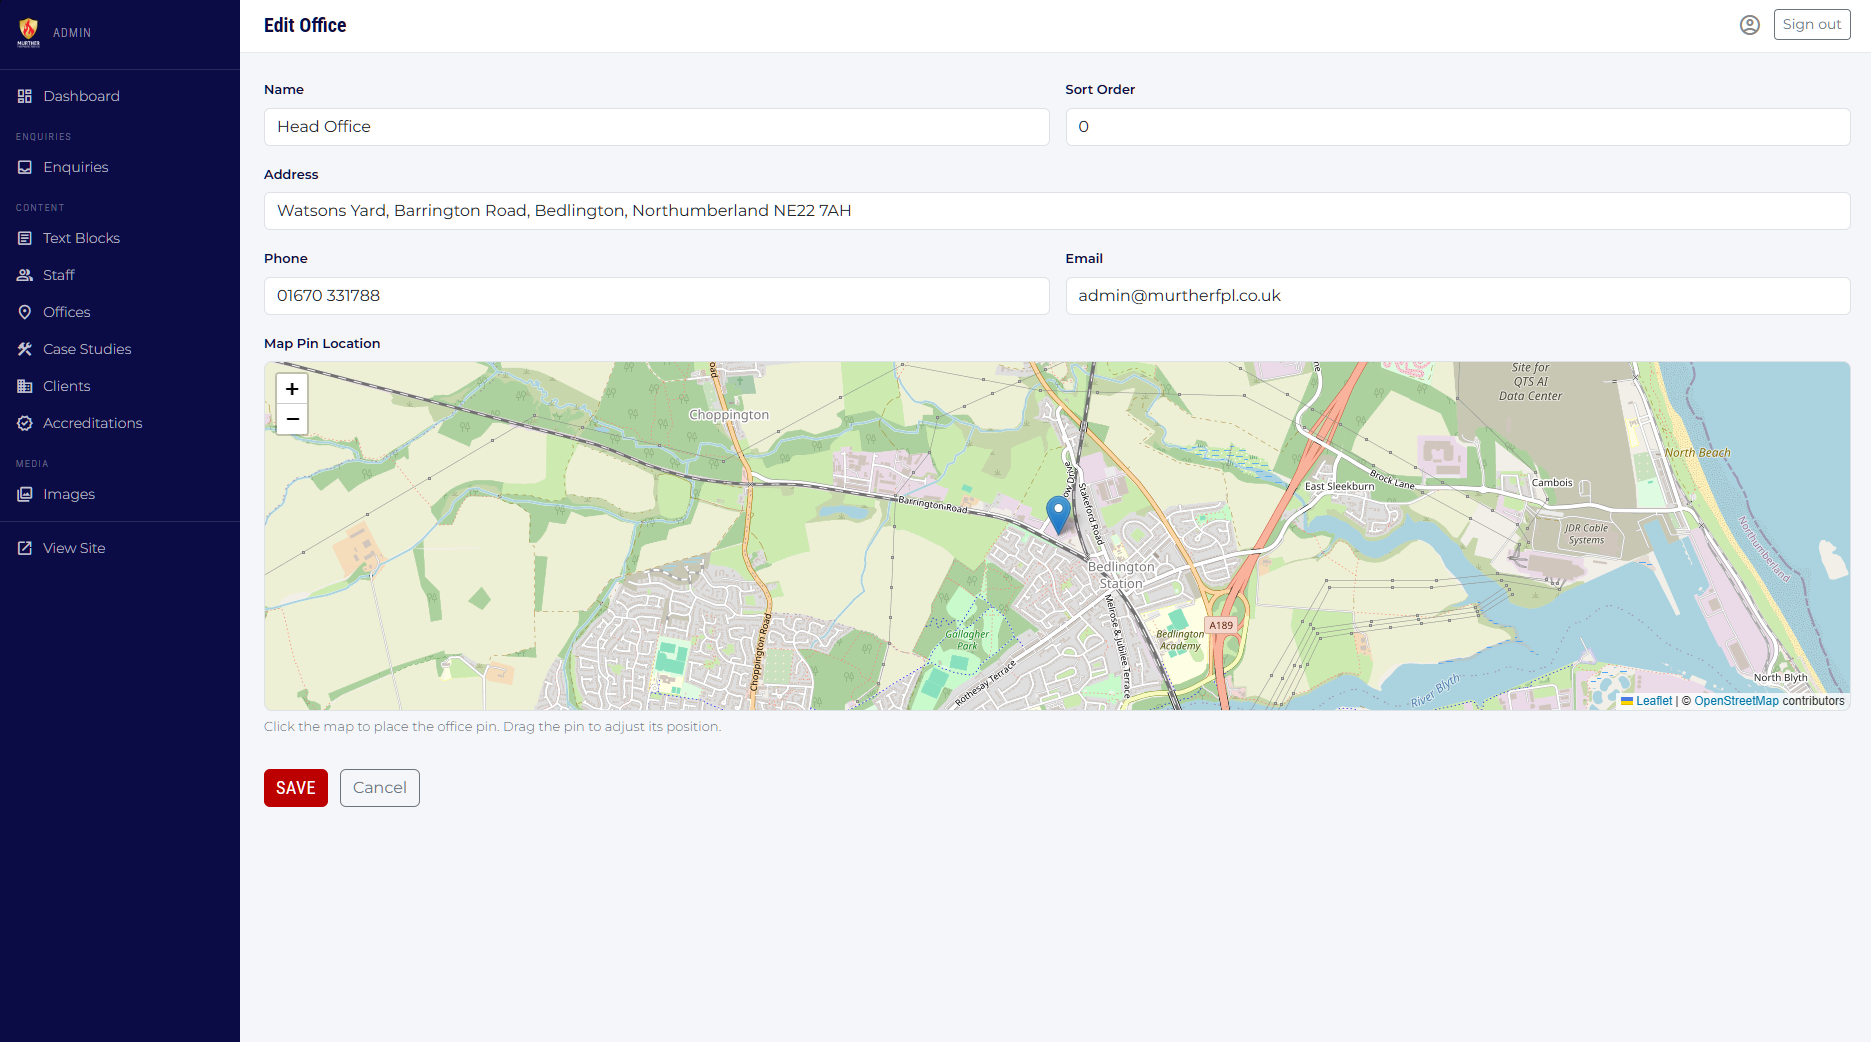
| Field | Notes | Required? |
|---|---|---|
| Name | Office name, e.g. "Head Office" or "Manchester". | Required |
| Sort Order | Currently not used but added for use in future features. | Optional |
| Address | Full postal address on one or multiple lines. | Required |
| Phone | Main telephone number for this office. | Optional |
| Contact email for this office. | Optional | |
| Map | Used to set the map pin location. | Required |
Case Studies
Project portfolio entries shown on the Case Studies page
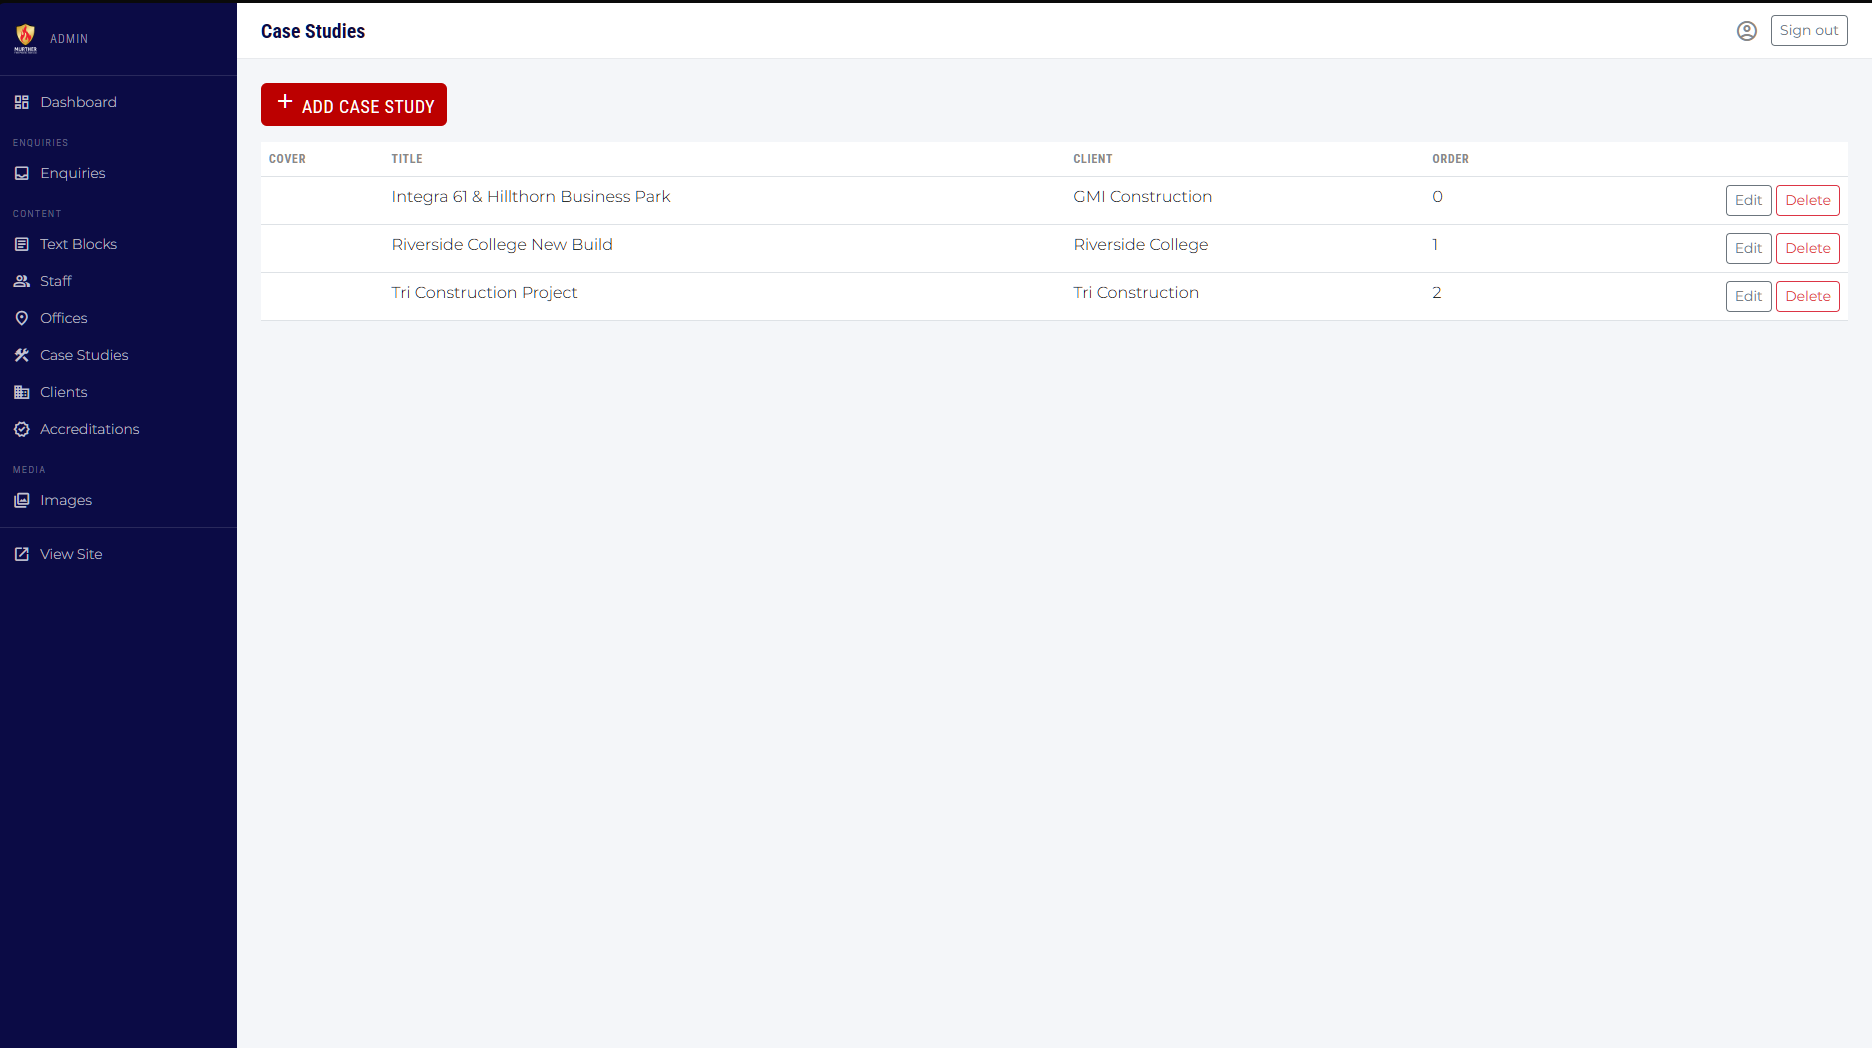
Each case study is a project write-up with a cover image, a description, and an optional gallery of images.
Adding or editing a case study
Click Add Case Study or Edit on an existing row.
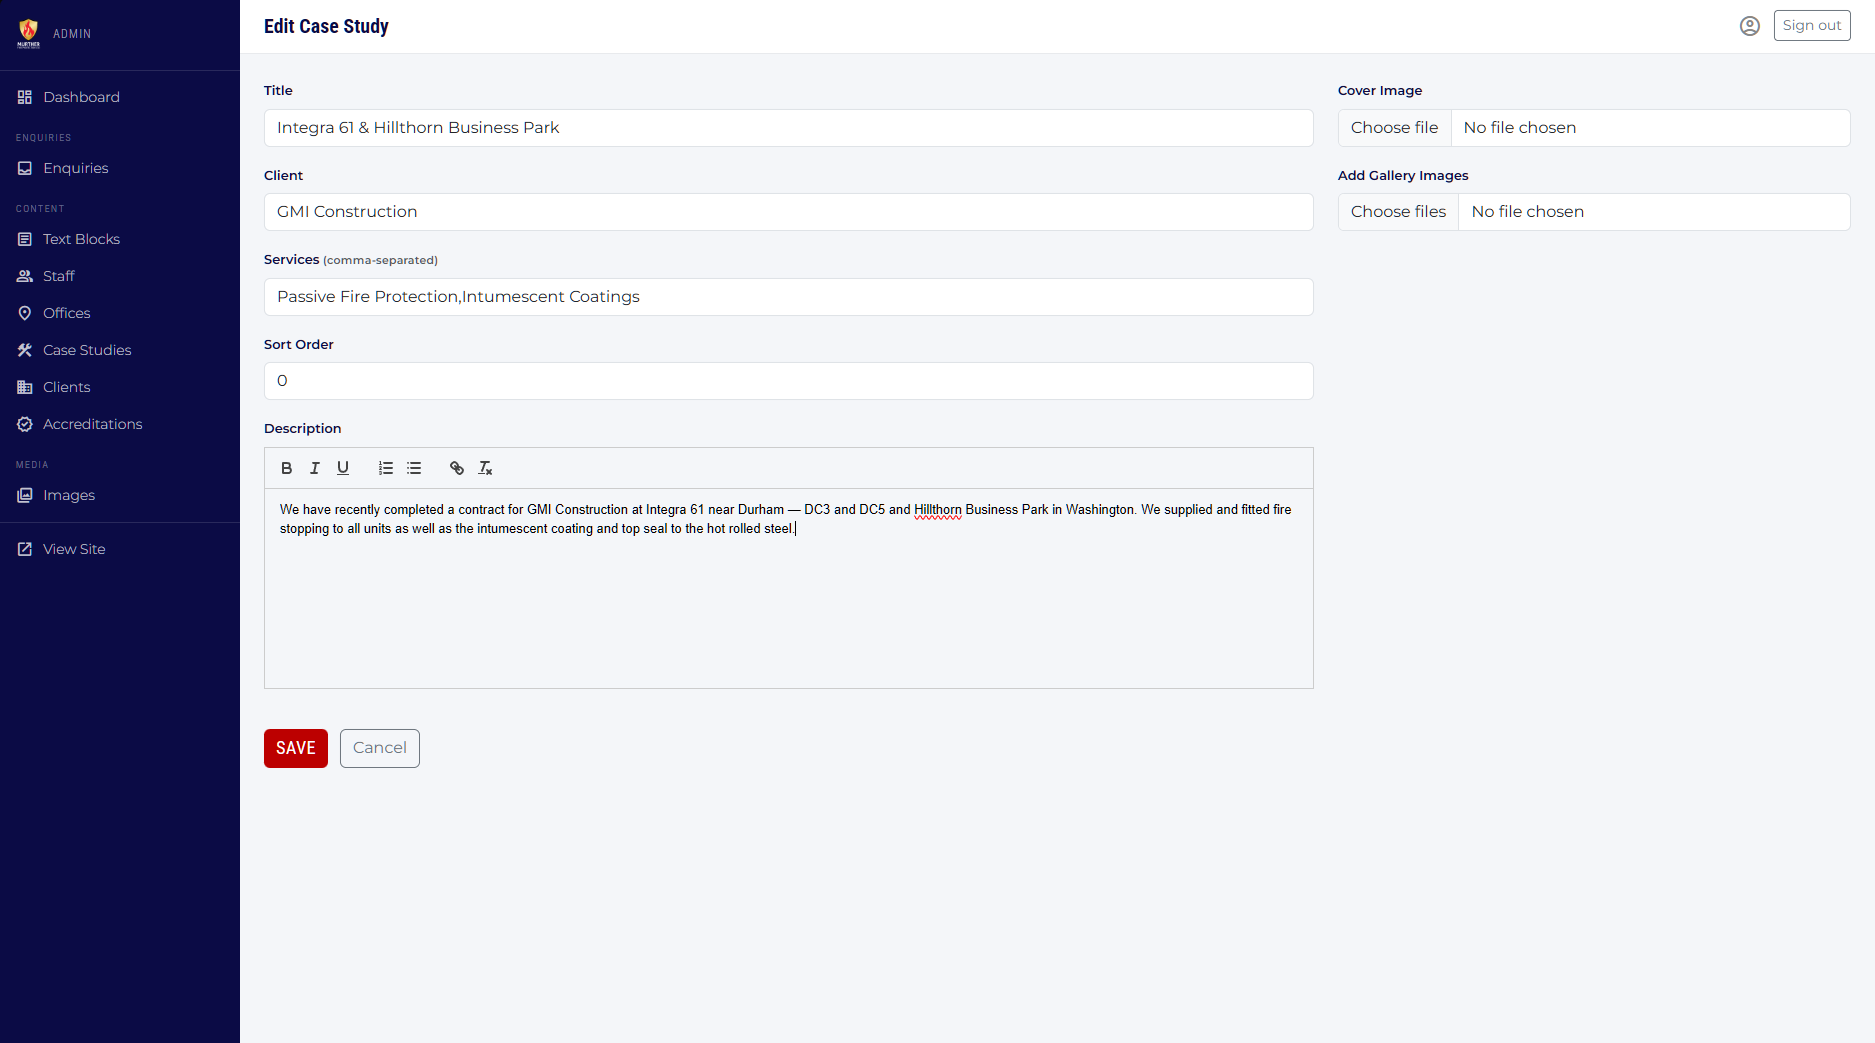
| Field | Notes | Required? |
|---|---|---|
| Title | Project title displayed as the case study heading. | Required |
| Client | The client name for this project. | Required |
| Services | Comma-separated list of services provided, e.g. Structural Fire Protection, Inspections. | Optional |
| Sort Order | Controls the order case studies appear on the public page. | Optional |
| Description | Full project description with rich text formatting (bold, lists, links etc.). | Optional |
| Cover Image | The main image shown on the case study card on the listing page. Replaces the existing image if you upload a new one. | Optional |
| Gallery Images | Additional photos shown within the case study. You can upload multiple images at once. Individual gallery images can be removed with the × button on each thumbnail. | Optional |
Clients
Client logos displayed on the home page
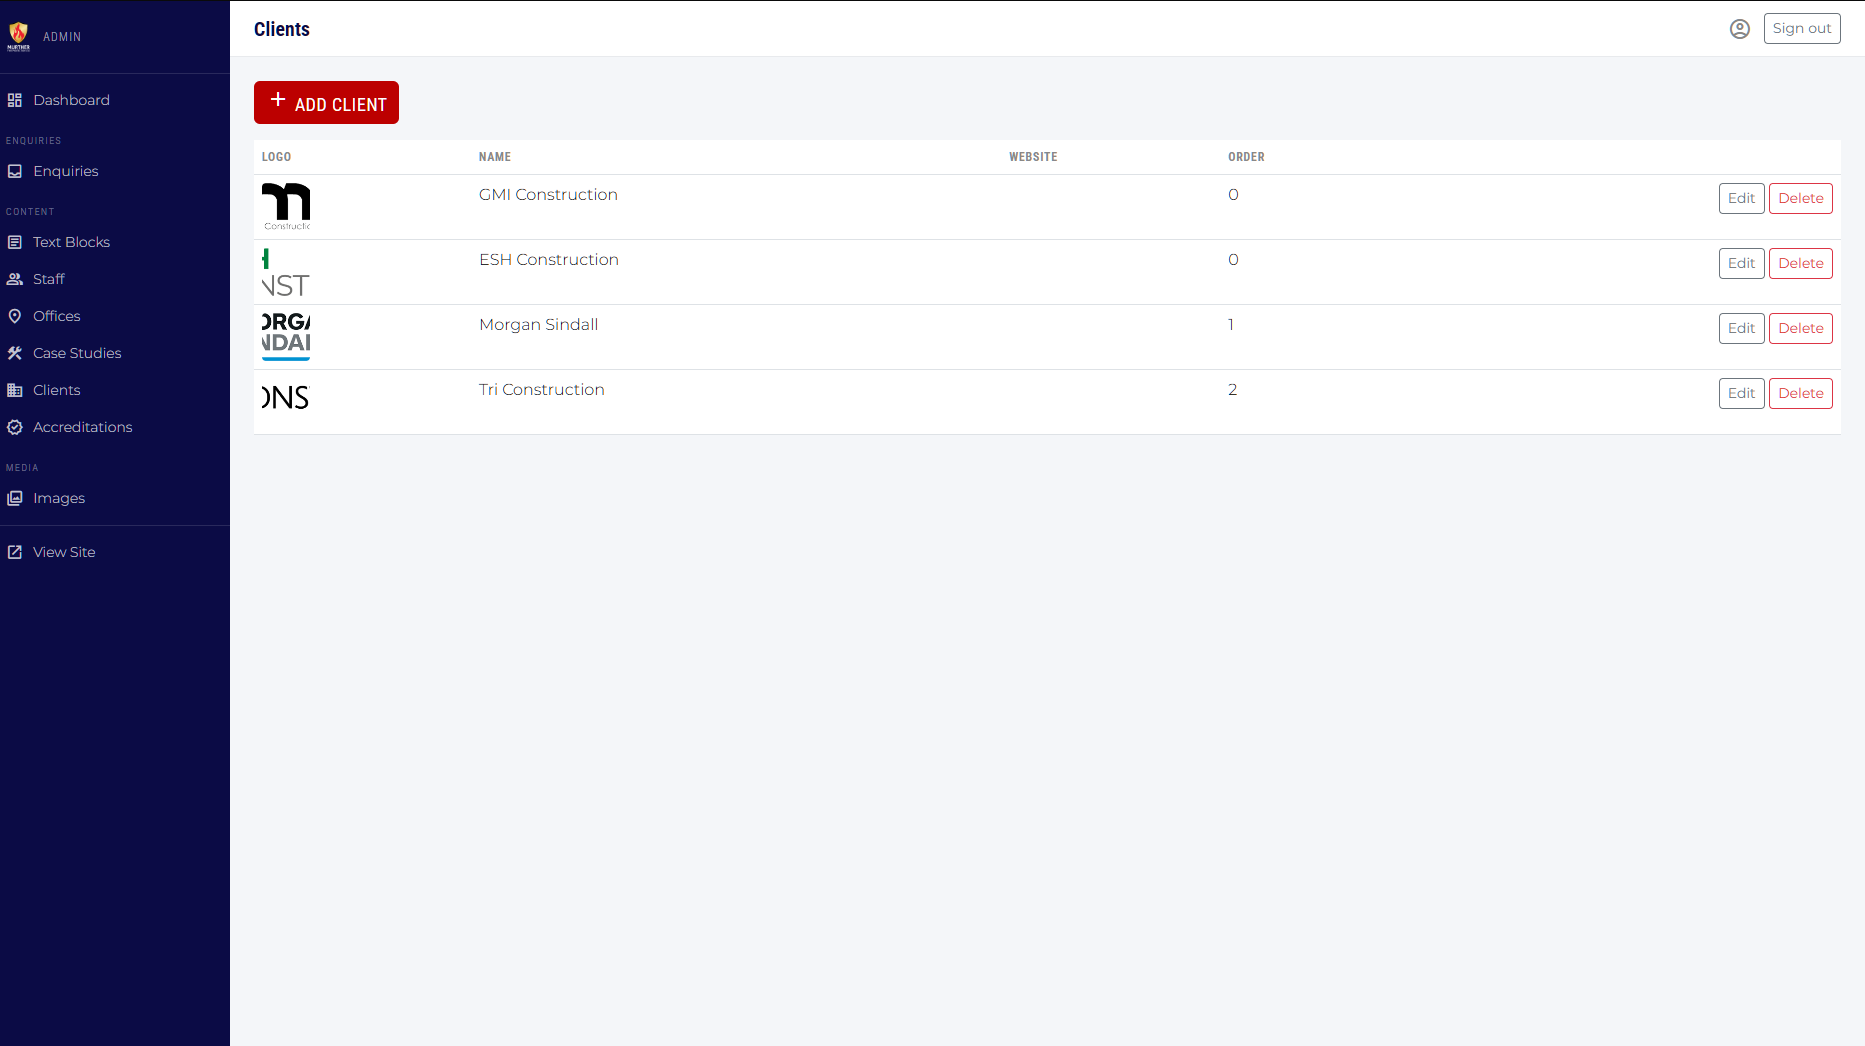
This section manages the row of client logos shown on the home page. Each entry has a name, an optional website link, and a logo image.
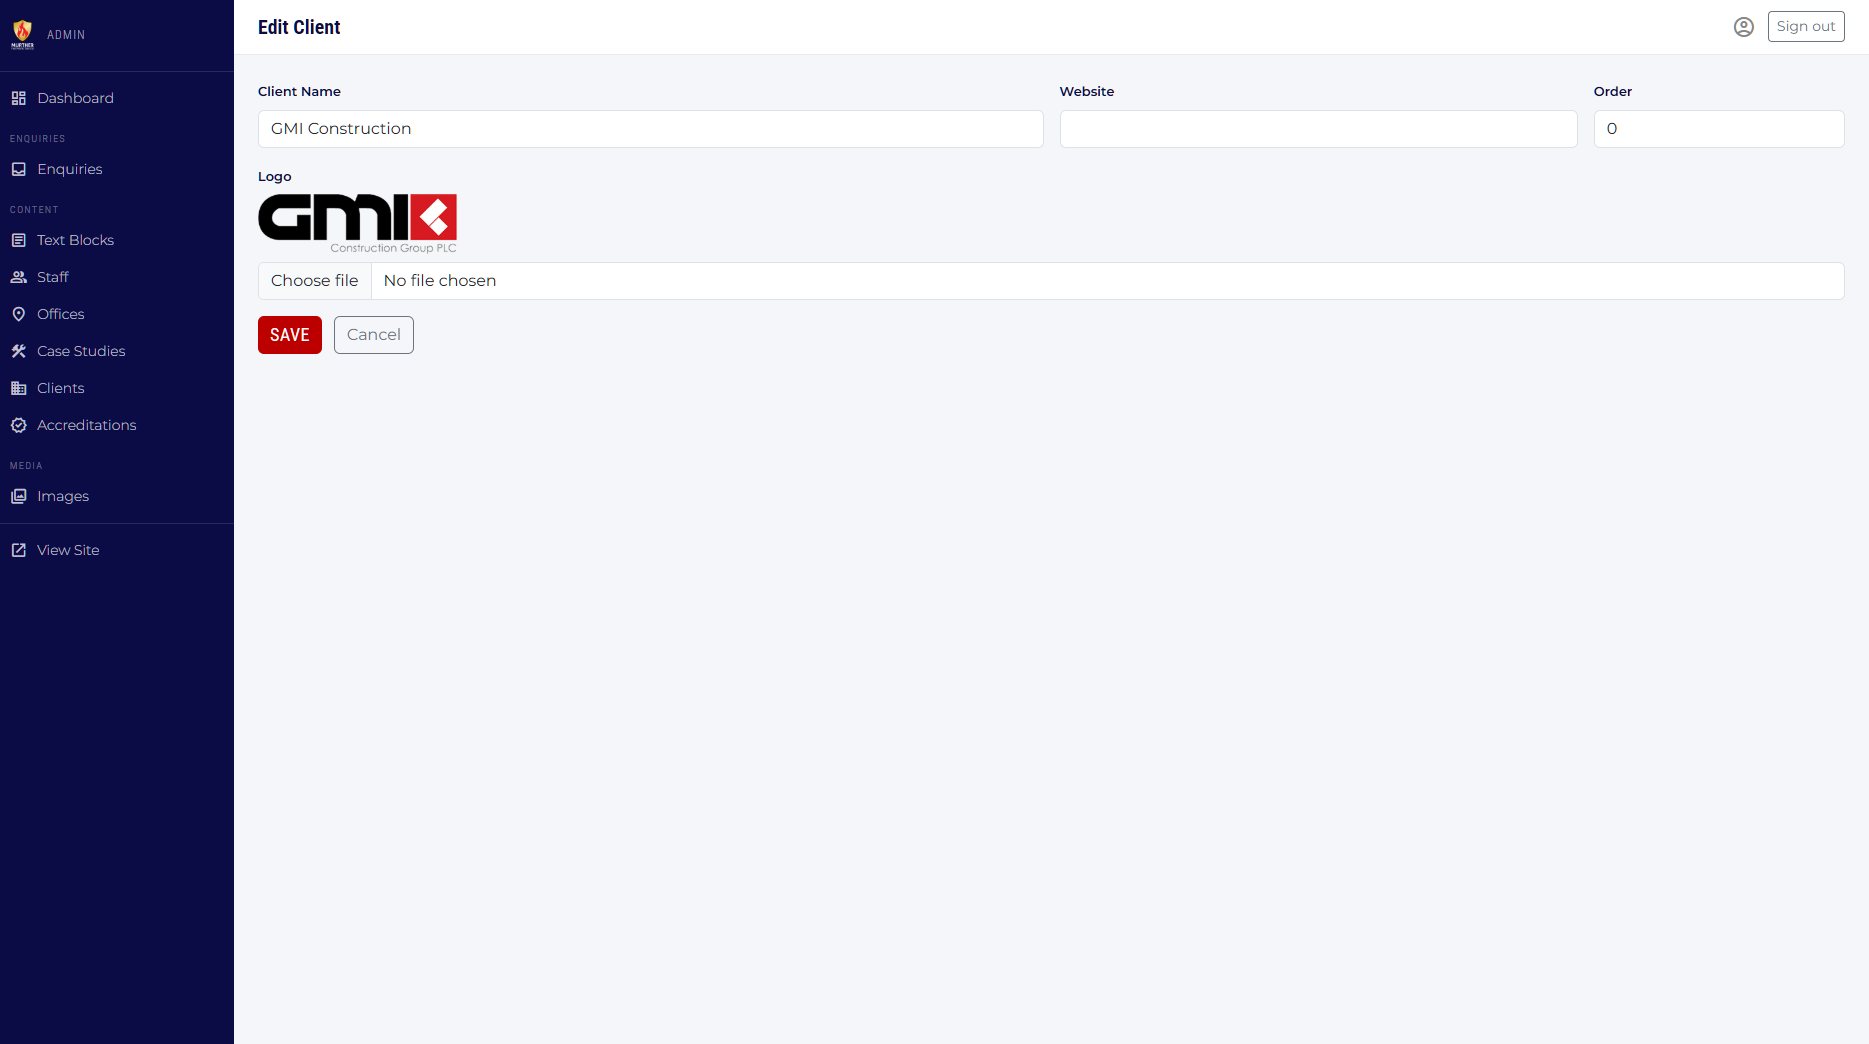
| Field | Notes | Required? |
|---|---|---|
| Client Name | The company name (may be shown as alt text on the logo). | Required |
| Website | Full URL including https://. Makes the logo a clickable link on the public site. | Optional |
| Sort Order | Controls left-to-right ordering of logos. | Optional |
| Logo | Upload a logo image. PNG with a transparent background works best. | Optional |
Accreditations
Accreditation logos displayed throughout the site
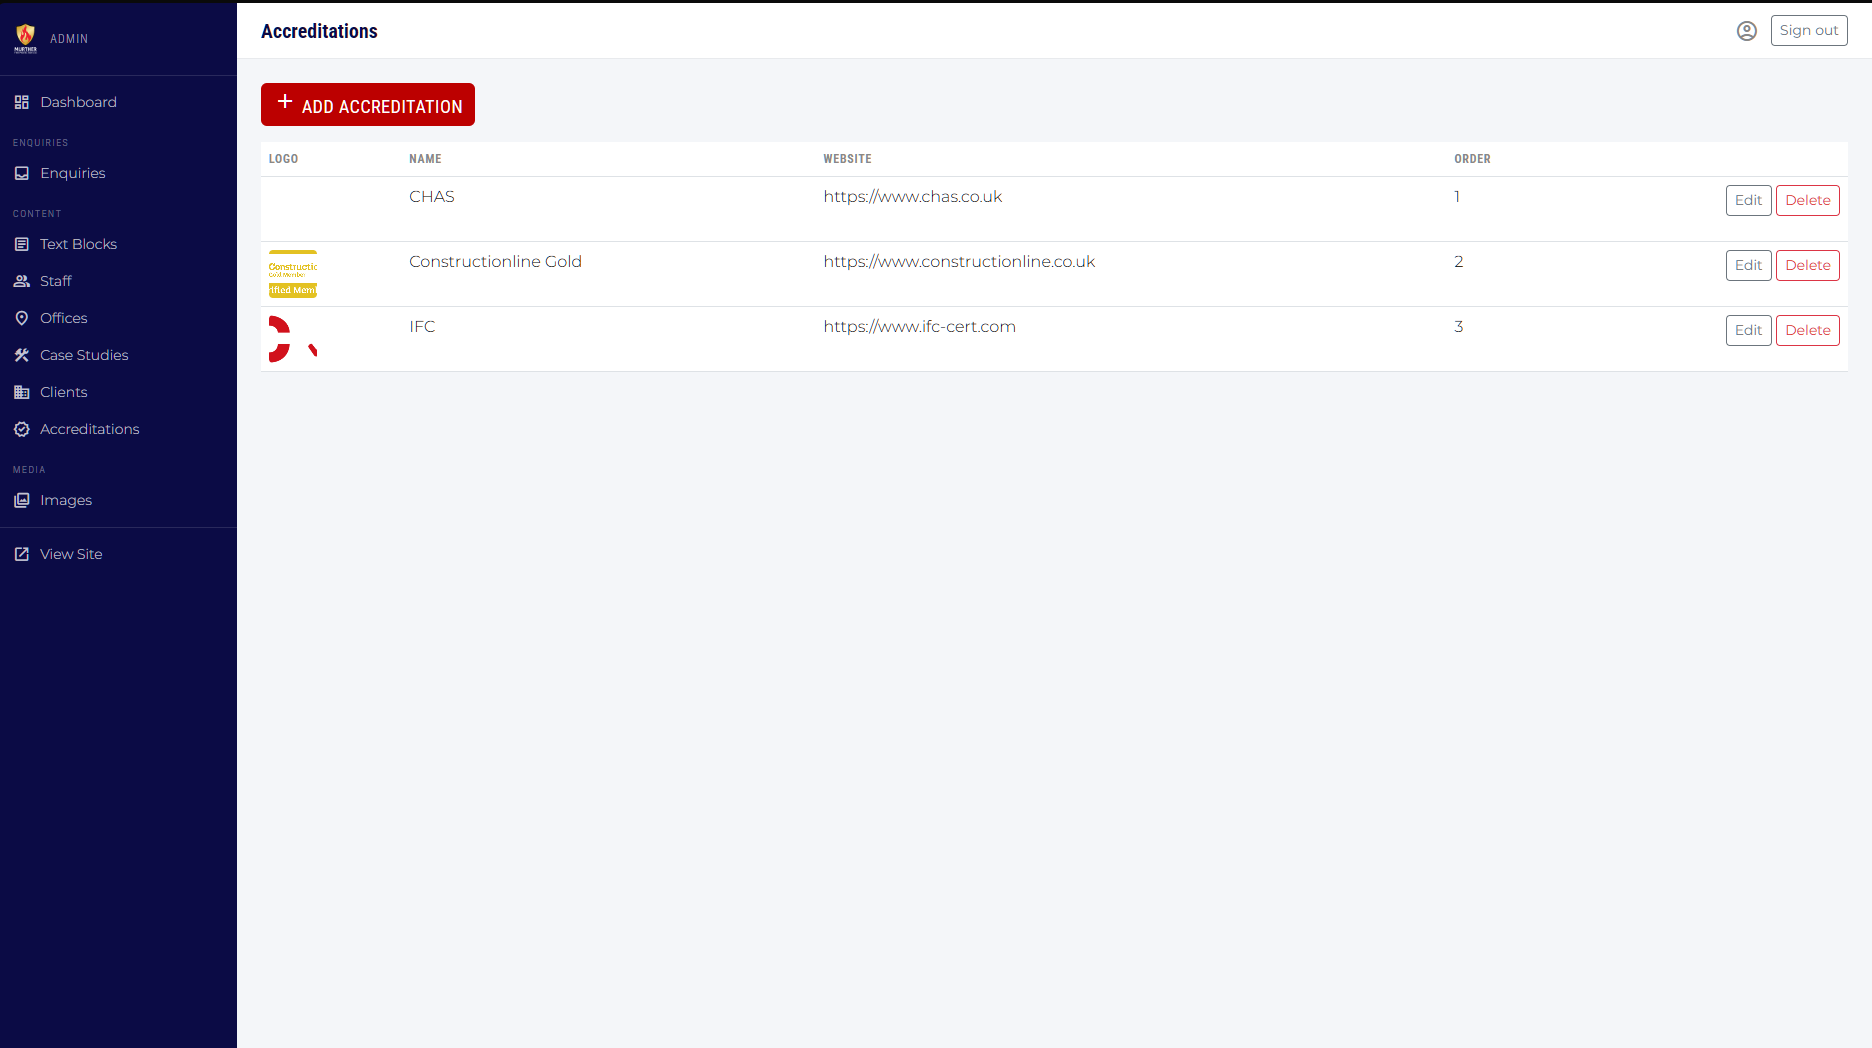
Accreditation logos (e.g. FIRAS, BAFE, IFC) are displayed in the footer and on relevant service pages. Managing them here updates every location on the site at once.

| Field | Notes | Required? |
|---|---|---|
| Name | The accreditation body name (used as image alt text). | Required |
| Website | Full URL to the accreditation body's website. Makes the logo a clickable link. | Optional |
| Sort Order | Controls the display order of logos. | Optional |
| Logo | Upload the accreditation logo. PNG with transparent background recommended. | Optional |
Text Blocks
Editable text snippets used in page headings and descriptions
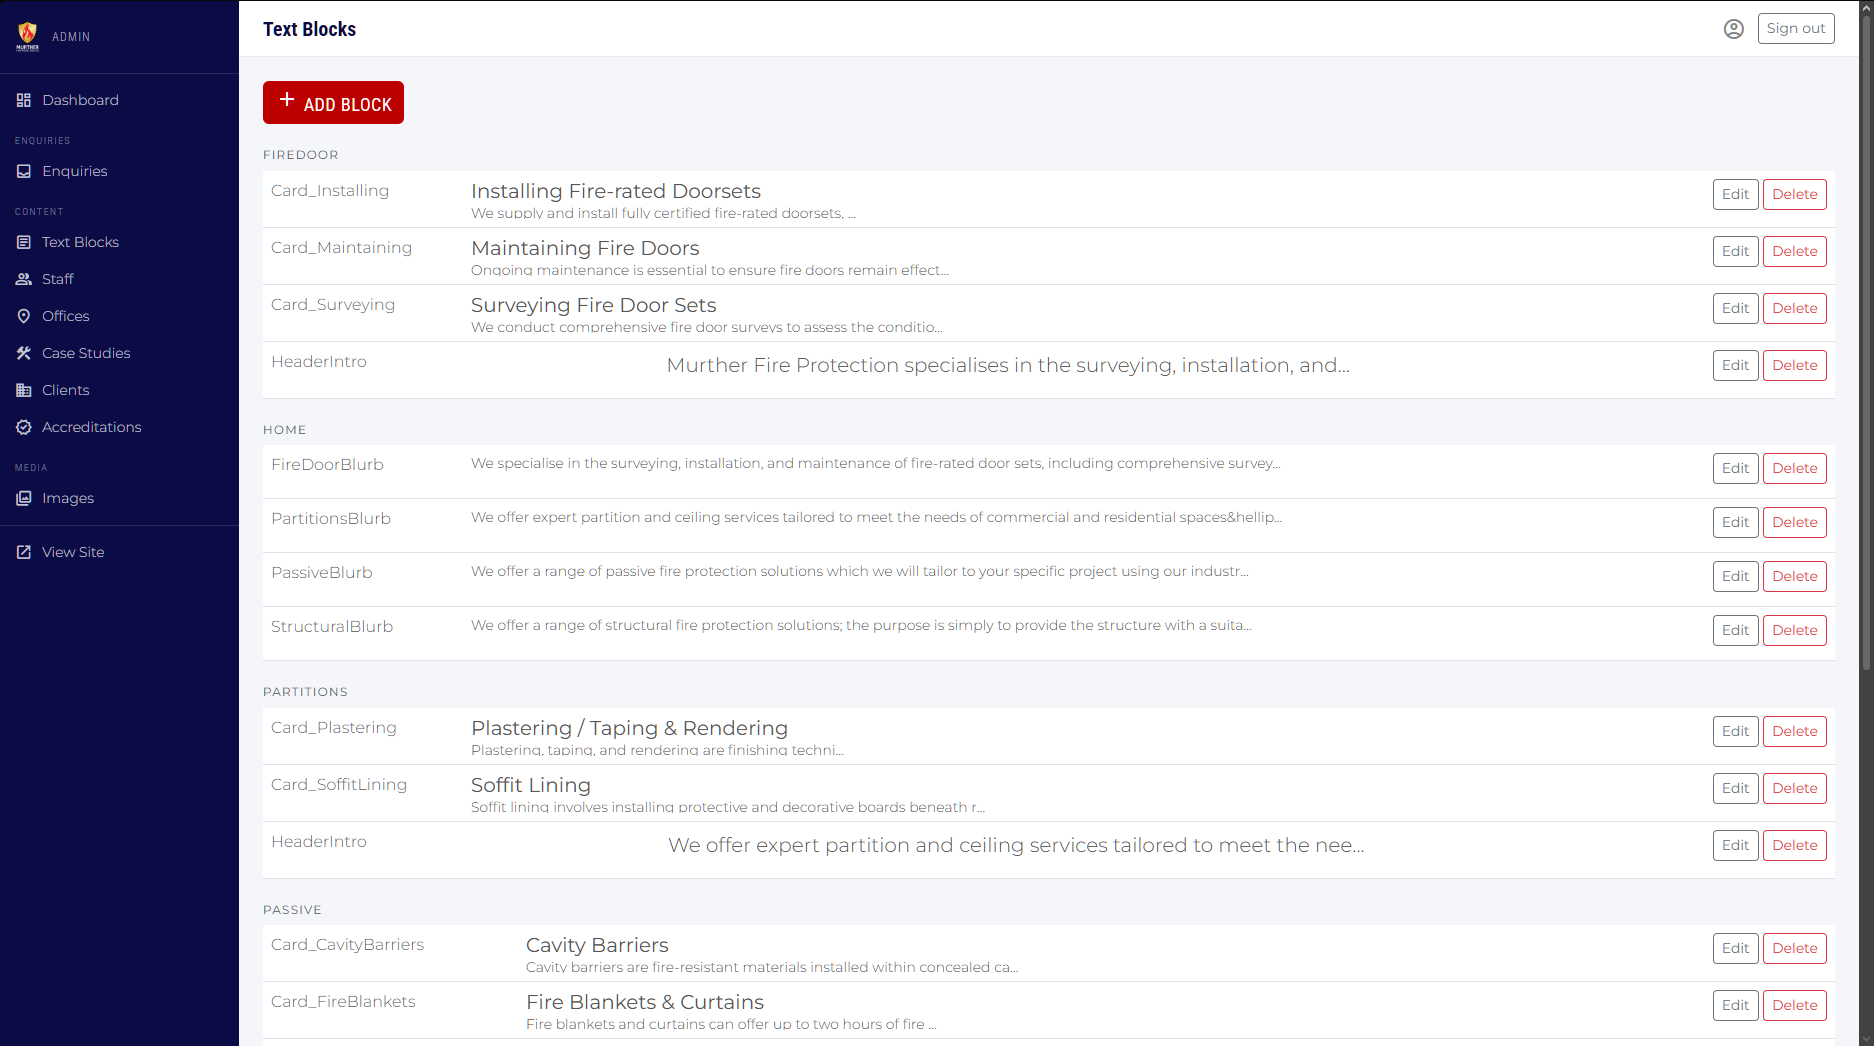
Text Blocks are named pieces of text that are pulled into specific places on the website — for example, the heading on the Home page hero, or the introductory paragraph on the Services page. They are organised by Section (which page they belong to) and Key (the specific location on that page).
You do not need to know the Section and Key names to edit existing content — just find the block with the preview text that matches what you want to change and click Edit.
Editing a text block

The Value field uses a rich text editor so you can apply formatting such as bold, italic, bullet lists and hyperlinks without any HTML knowledge.
| Field | Notes | Required? |
|---|---|---|
| Section | The page this block belongs to, e.g. Home, About. Used for grouping only. | Required |
| Key | The specific slot on the page, e.g. HeroHeading, IntroText. Must match what the developer set up. | Required |
| Value | The actual text or HTML that will appear on the website. Supports rich text formatting. | Optional |
Image Library
A central store of images that can be embedded anywhere
The Image Library lets you upload images once and then use them in case study descriptions, text blocks, or anywhere on the site that accepts HTML. Each uploaded image gets a permanent URL that you can copy and paste.
To upload images, click Choose files, select one or more images from your computer, then click Upload. Thumbnails of your uploaded images appear in the grid below.
To use an image in a text block or description, copy the URL shown beneath its thumbnail and paste it as an image in the rich text editor.
Enquiries
Contact form submissions from the public website
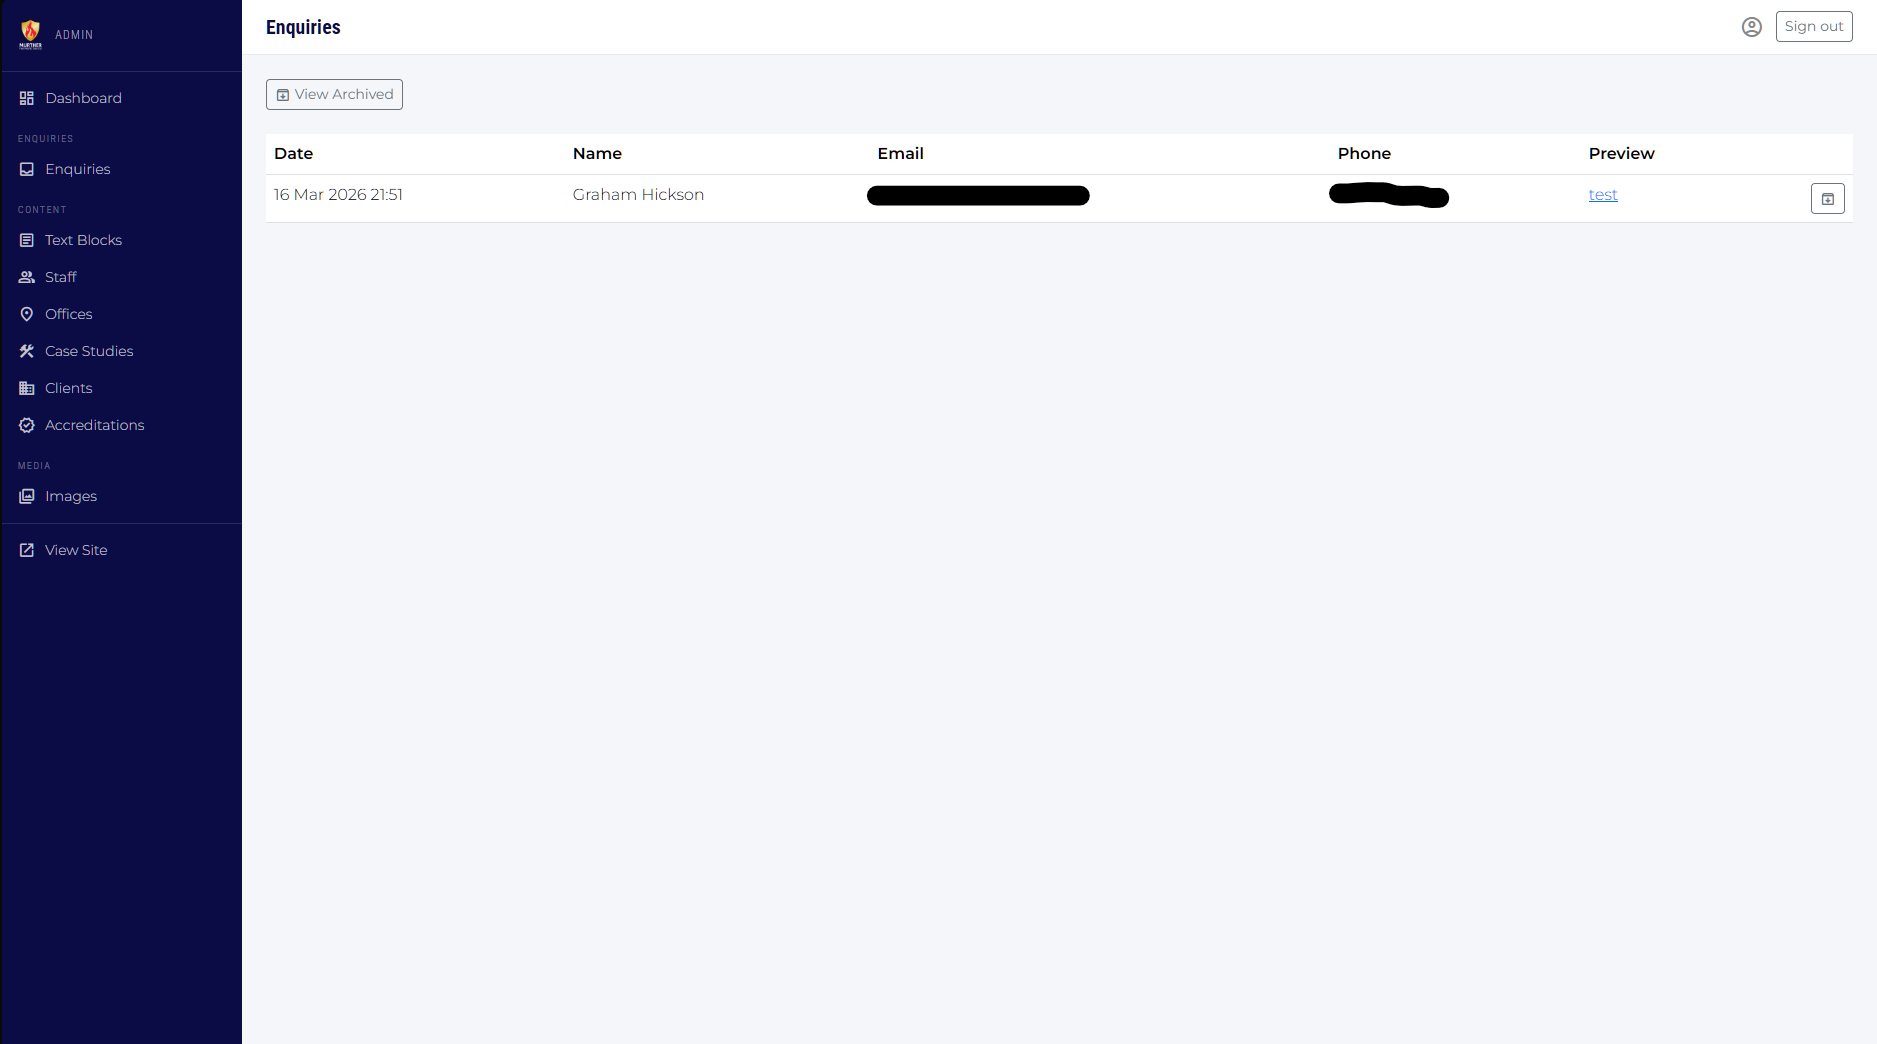
When a visitor completes the contact form on the public website, their message is saved here and an email notification is sent to the configured address. The Enquiries section works like a simple inbox.
Reading an enquiry
Unread enquiries are displayed in bold in the inbox list. Click the message preview (or the name) to open the full detail view. The message is automatically marked as read when you open it.
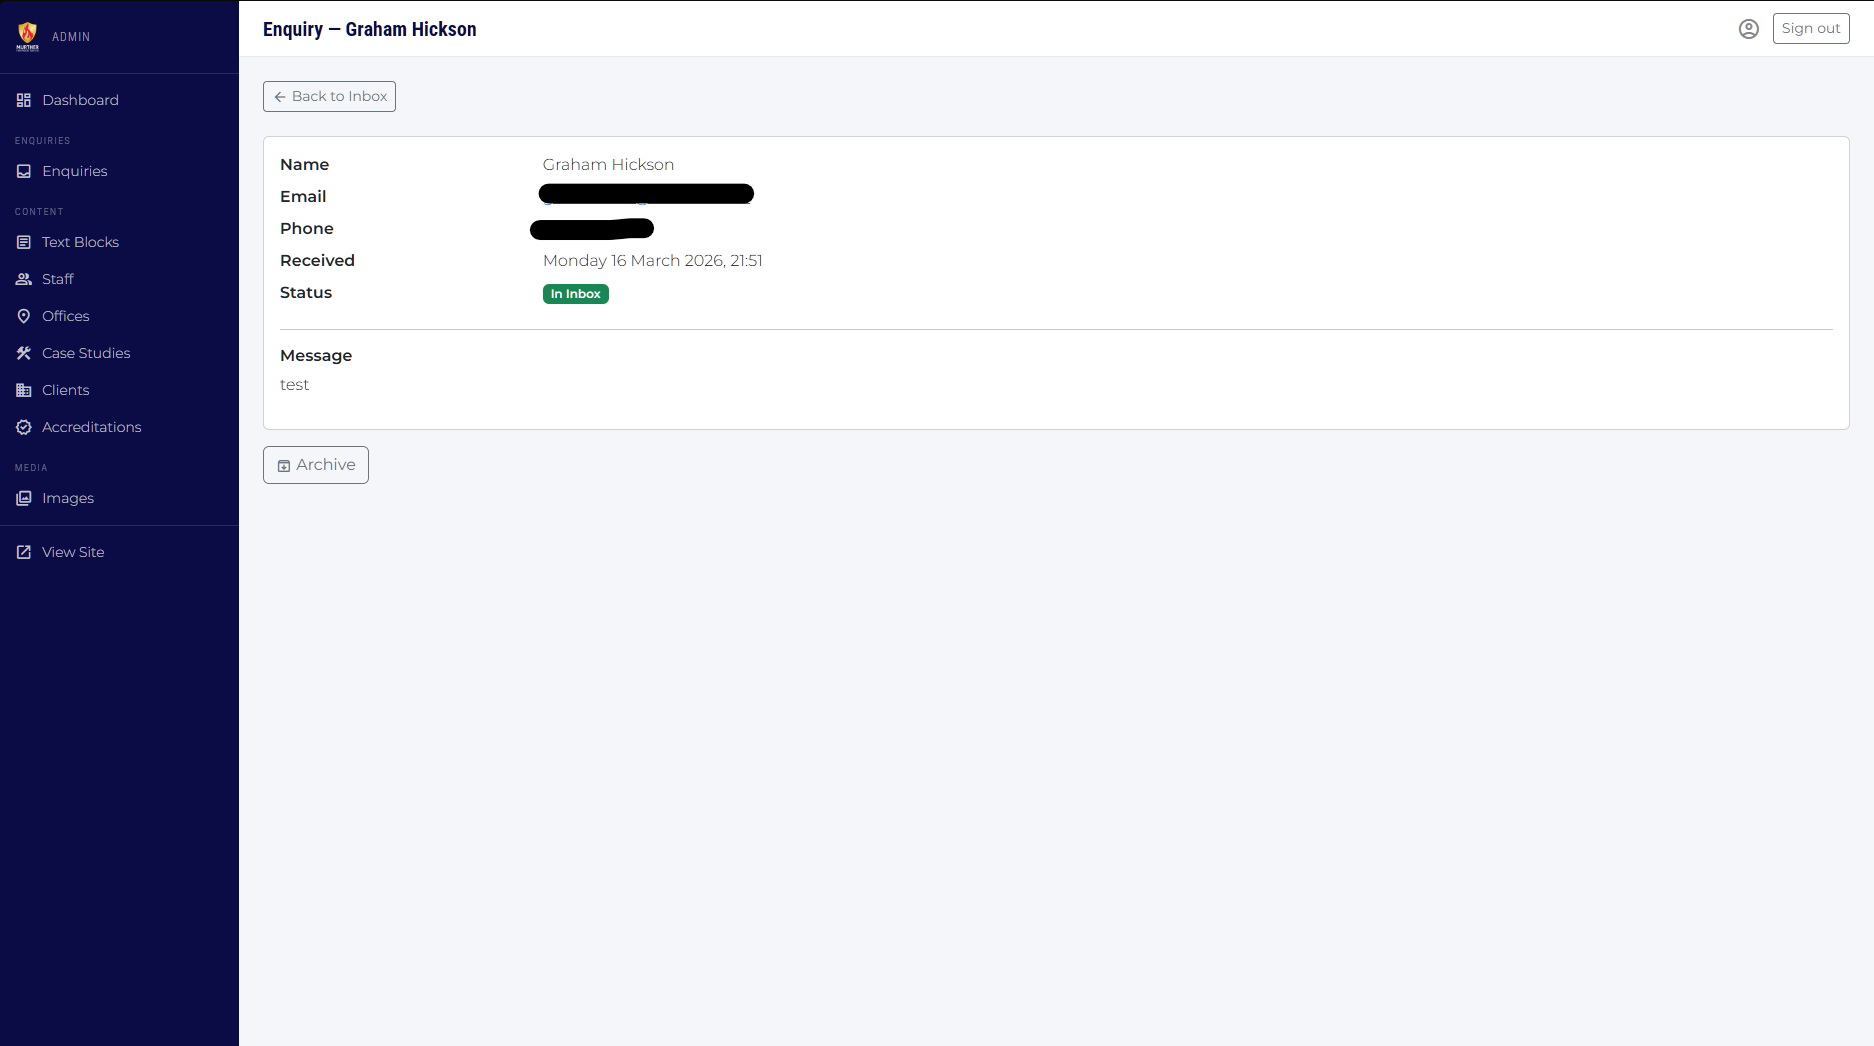
The detail view shows:
- Name — the sender's name.
- Email — a clickable link that opens your email client so you can reply directly.
- Phone — if provided.
- Received — the date and time the form was submitted.
- Status — whether the message is in the inbox or archived.
- Message — the full text of the enquiry.
Actions
| Action | When available | What it does |
|---|---|---|
| Mark as Read | Inbox only, unread messages | Removes the bold formatting from the inbox row, indicating you have seen the message. |
| Archive | Inbox messages | Moves the enquiry out of the main inbox into the archived view. The message is not deleted — it is just hidden from the inbox. |
| Restore to Inbox | Archived messages only | Moves the enquiry back to the main inbox. |
| Delete Permanently | Archived messages only | Permanently removes the enquiry from the database. This cannot be undone. You will be asked to confirm before deletion. |
Switching between inbox and archive
At the top of the Enquiries page there is a toggle button: View Archived / Back to Inbox. Use this to switch between unreceived messages and the archive.
Tips & Notes
Useful things to know
Rich text editor
Several fields (Staff Bio, Case Study Description, Text Block Value) use a rich text editor called Quill. It works like a simplified word processor:
- Select text and use the toolbar to apply Bold, Italic, or Underline.
- Use the list buttons to create bullet or numbered lists.
- Use the link button (chain icon) to insert a hyperlink. Select the text first, then click the button and enter the URL.
- You can paste text from Word or the web — the editor will strip unwanted formatting automatically.
Image tips
- JPEG or PNG are the most compatible formats for photos. Use PNG for logos where you need a transparent background.
- Keep photo file sizes reasonable — ideally under 1 MB each — to ensure fast page loading.
- Cover images for case studies look best at a landscape (wide) aspect ratio.
- Staff photos look best as a square or portrait (tall) crop.
Sort Order
Most sections have a Sort Order field. Items with a lower number appear first. You do not need to number items consecutively — for example, you could use 10, 20, 30 so that there is room to insert items in between later without renumbering everything. Items with the same sort order or with no sort order set will appear in the order they were created.
Saving changes
Always click the Save button to confirm your changes. If you navigate away from a form without saving, your changes will be lost.
Nothing appears on the public site after saving
Changes take effect immediately — there is no separate publish step. If you save a change and it does not appear on the public site, try a hard refresh in the browser (Ctrl + Shift + R on Windows, Cmd + Shift + R on Mac) to clear the browser cache.